Light Modifiers - How and Why We Use Them
Softboxes, reflector dishes, umbrellas and beauty dishes are just some of the modifiers that we have available to us as photographers to attach to our lighting to change the way it works for us. In this article I will go through the basics of modifiers and the how and why they are used. Before we talk about actual modifiers, we perhaps need to check that we totally understand how light is affected by simple rules when it comes to the quality of the light. Now, the word quality is an interesting one. What we mean by quality and the quality of light needed for one situation may be different to another situation. When I discuss quality of light to my mentoring students, I usually split it into two main characteristics with another secondary one as well. The first thing I talk about is hardness of the light. This relates to the edge of the shadow and how that presents itself. If the light source is small relative to the subject, then the edge of the shadow will be a more solid line, and clearly defined so we call that light “hard”. If the shadow is diffuse at its edge due to the light source being large compared to the subject then the light is usually referred to as “soft”. Obviously there are different levels of hardness, all dependant upon the light size to the subject. The next characteristic I talk about is contrast, which relates to the difference in stops between the highlight side and the shadow side in a portrait. The bigger the difference, the more contrast there is. Now people often call the combination of contrast and hardness as harsh light but contrast is often influenced by light position and closeness to subject and a little by the modifier. You can have soft light that is both contrasty or not and hard light that is also contrasty or not, all depends on positions and the modifier. The third characteristic that modifiers affect is the specularity or shininess of the highlights. In simple terms the lining of the modifier if silver will give off shinier highlights than if it is matt white. What modifiers should you use?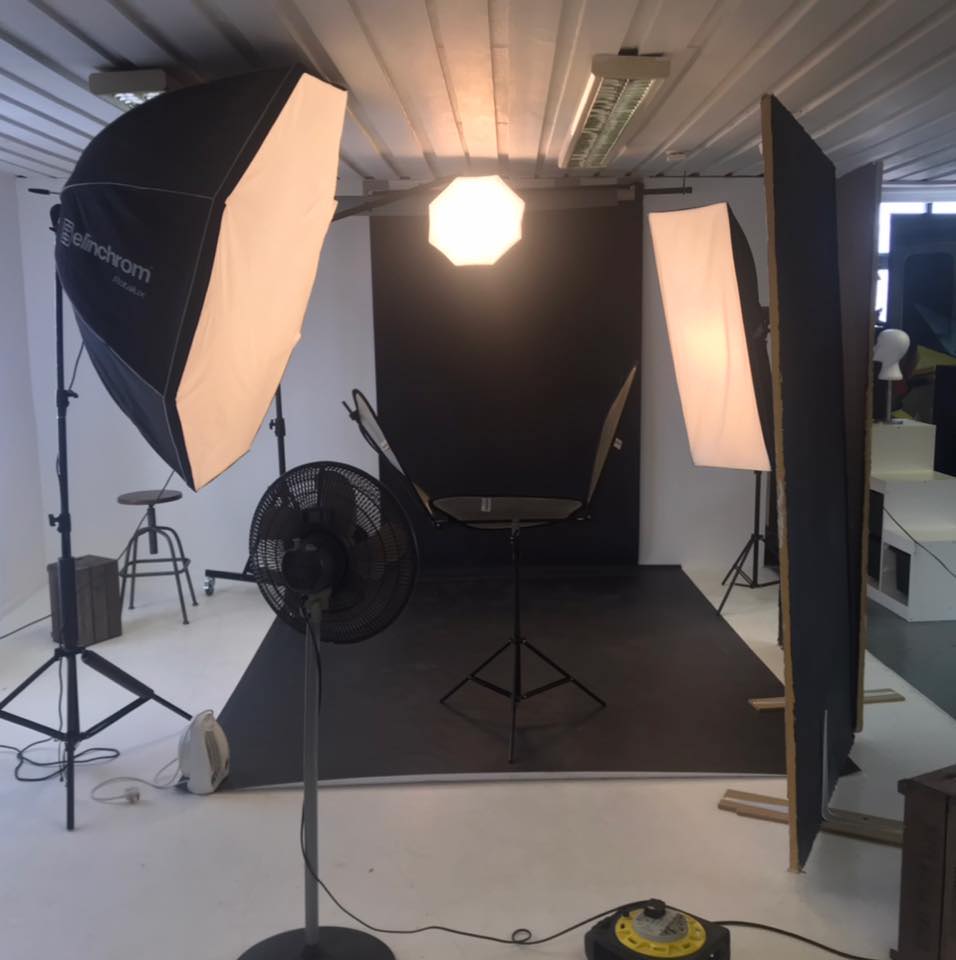
Bare Flash
The design of most studio lights is to use a round flash tube to throw the light as evenly as possible in all directions in front of the head. This is great as it helps get it more evenly spread but a nightmare to control as it does indeed go everywhere.So, bare bulb has the odd use but generally not what we use as portrait photographers
Reflector Dishes
Next up is reflector dishes. These go from tiny to fair sized. From little five inch spill kills to 18 inch maxi reflectors. They are usually silver on the inside and fit direct to the head with no diffuser, their job is to control the spill of light and funnel it all straight forward. They are very efficient and give great output to the light but unless the largest ones they are small sources and produce very hard light when used in portraiture, Great for putting spots on backgrounds but I would rarely use for normal portraits unless recreating the hard lightlooks of Hollywood in the 30’s and 40’s or punchy fashion images with models. Reflector dishes are great for maximising the power of the light if used with low powered lights.
A beauty dish is a modification of the reflector dish, comes in various sizes and with a central deflector which prevents the flash coming straight out, it hits the deflector then bounces back into the dish to then come forward again. The point of this is to reduce the hot spot in the middle. Used a lot in fashion and beauty photography, they can provide beautiful semi hard light with crisp edges to it. They work well with good make up and clear skin but can show up blemishes and skin defects a lot. For general portraiture I find personally I use mine very little though I know others that do. I prefer, using my Elinchrom system to use a 70cm deep octobox with deflector disc and single layer of diffusion to give a similar but more gentle effect. In short, reflector dishes can be useful but they are hard light unless used really really close with the larger ones.
Softboxes
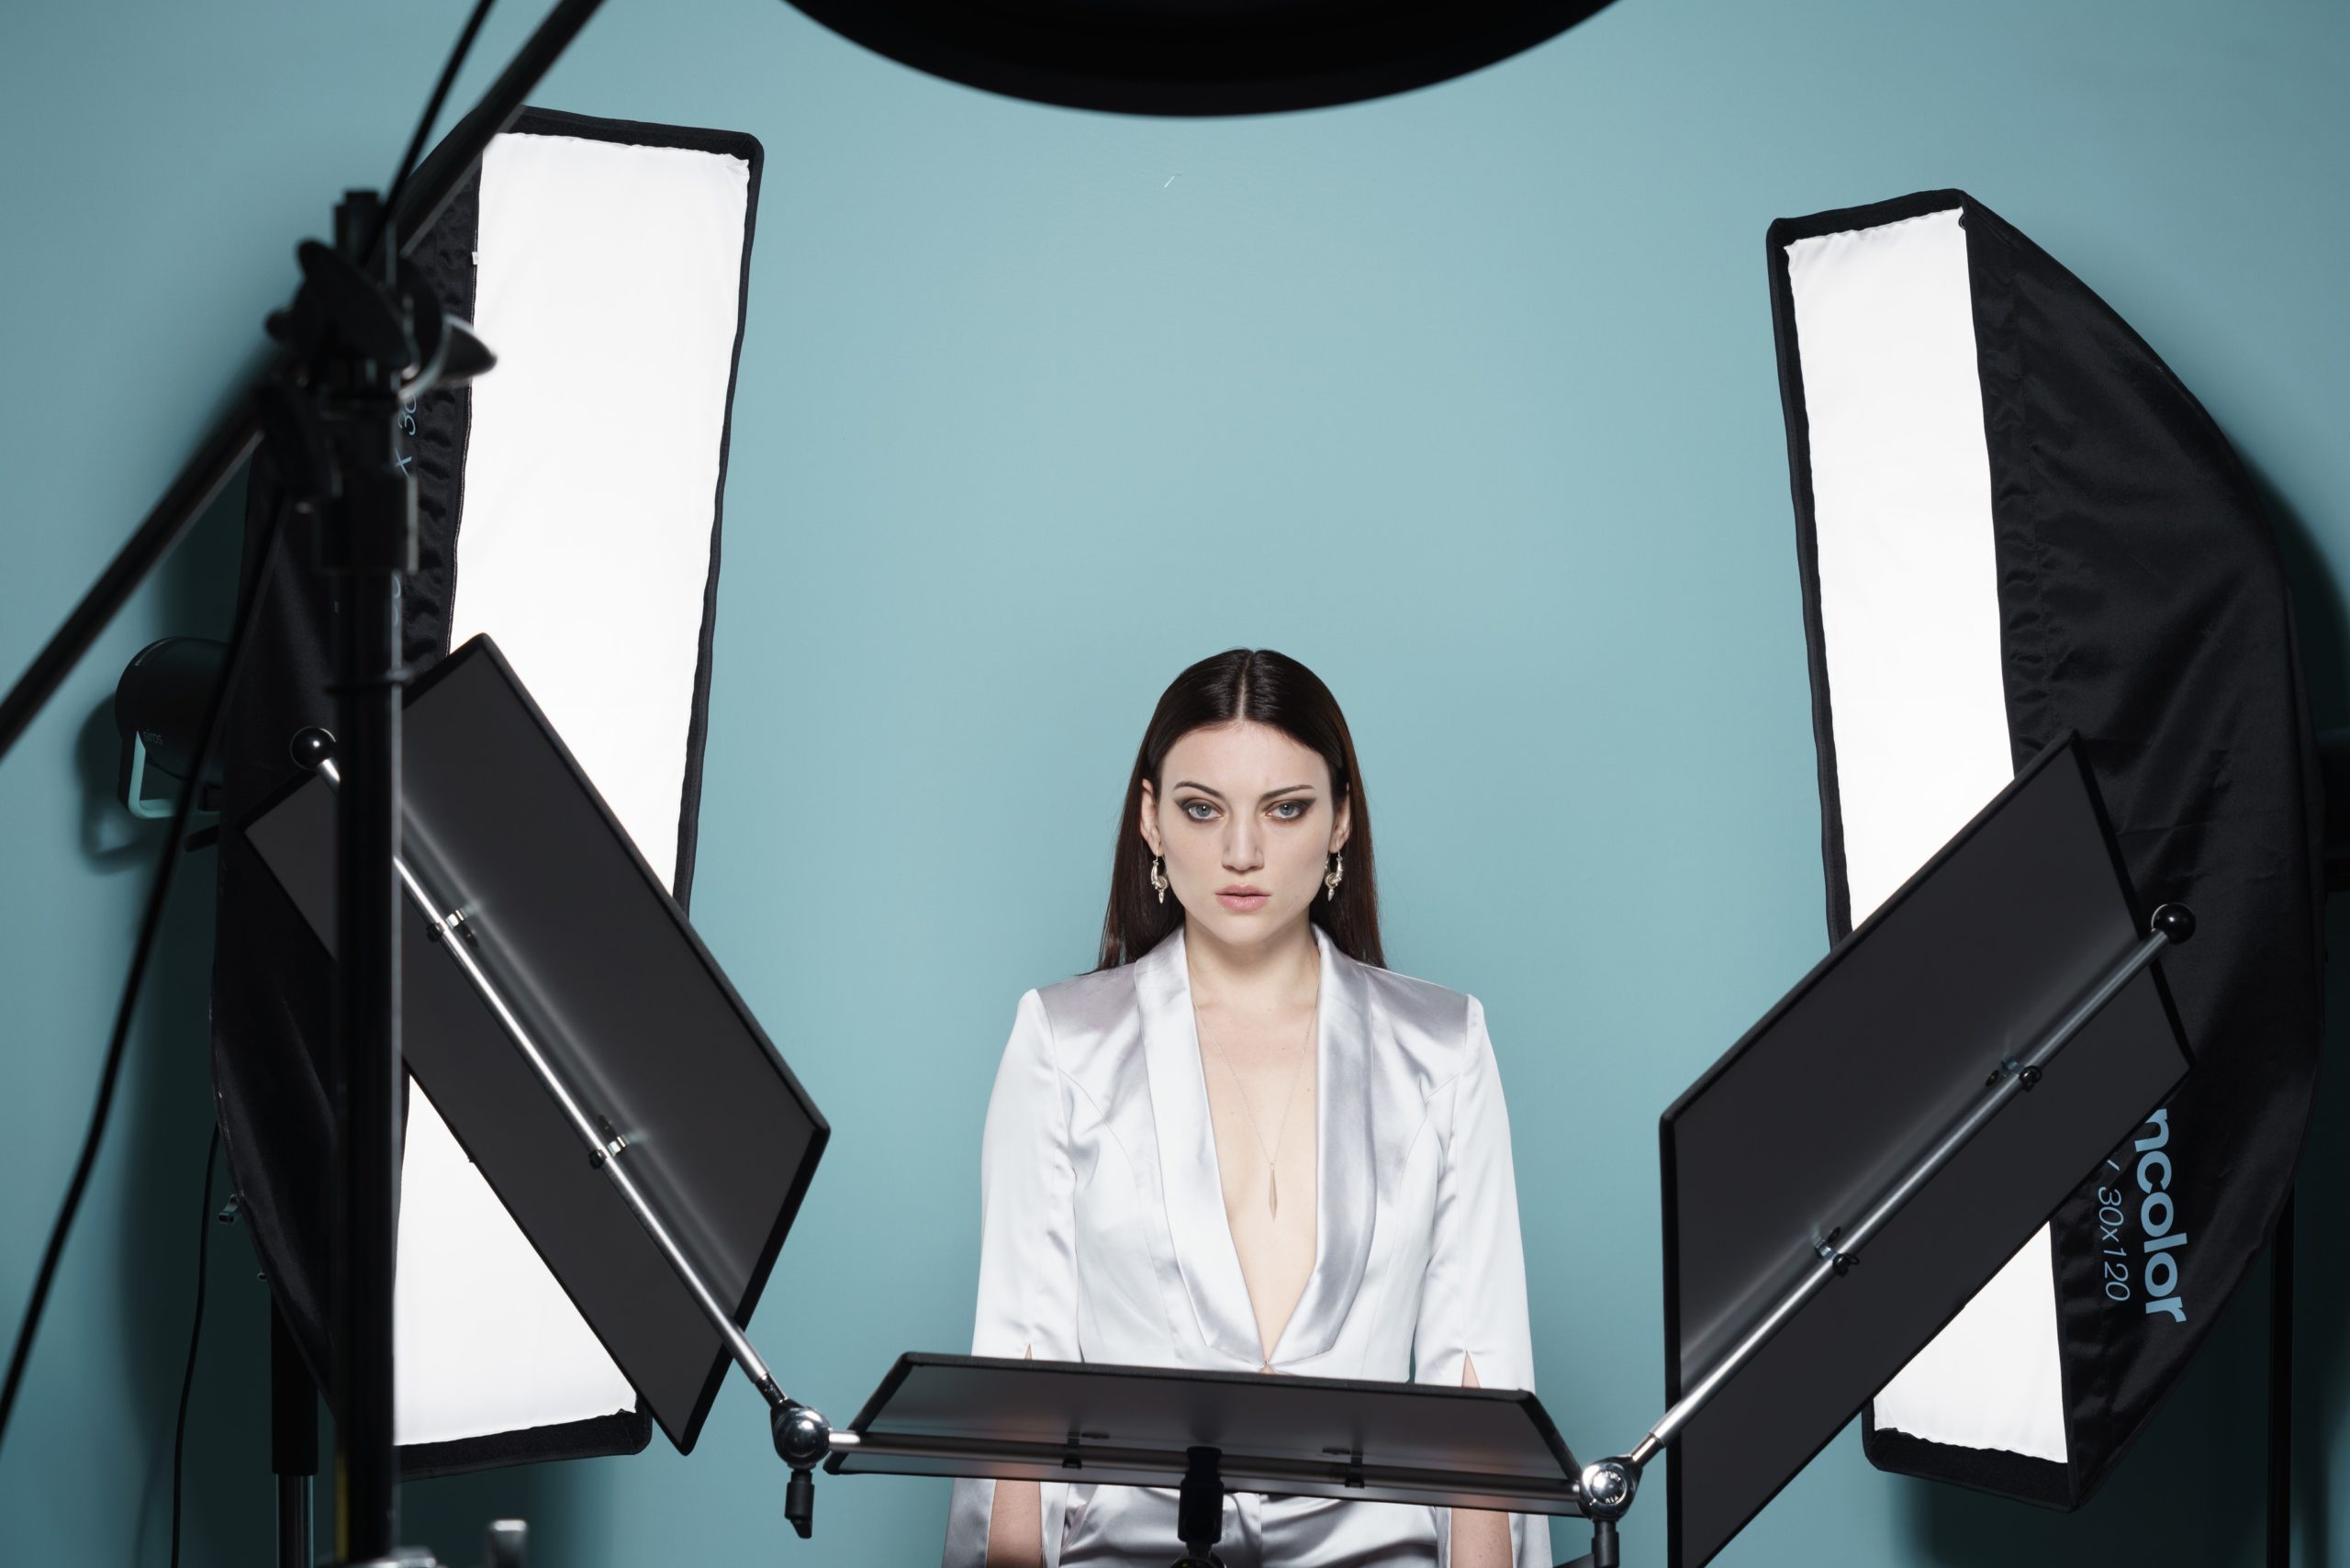
Softboxes are what most people think of when they thing of modifiers. They come in all shapes and sizes from small to huge, and their purpose is to increase the size of the light source to soften and spread it. The shape affects the spread and the size affects the softness ( though you can make them softer or harder by moving closer or further away). The ones I use the most are large octoboxes and strip boxes. As you can guess, octoboxes are octagonal in shape and strips are long and narrow. The strips allow me to precisely control the spread of the light and prevent spill. The big octobox or similar is a really versatile source. It can be pulled back a little to light a family or big group or brought in really close to get super soft light, bringing it in close makes it bigger relative to the subject and bigger is softer when close.
Umbrellas
Umbrellas come in many sorts, sizes and finishes. They can be “shoot through” where the fabric is diffuse and the flash is fired directly though the umbrella towards the subject and the umbrella acts as a diffuser. The other type is indirect where the flash fires into the umbrella and bounces off the inside before coming back out. They can be white or silver or even gold to give different effects to the light. The silver or gold will give a punchier more specular light. The white inside of a bounced umbrella can be a really useful modifier as it is easy to transport, put up and position. Some come with an outer diffuser which adds another layer of softness due to diffusing the light some more. I use these a lot – in particular the Elinchrom deep white 125cm and outer diffuser. It’s easy to get a beautiful quality of light from it in close to the subject. The only downside to umbrellas at times is they are not as easy to control as a softbox and have more spill. Once mastered they are a great modifier.
How to light this portrait - Location Portrait
How to light location photography – Belfast. This location is Belfast’s oldest bar. I did a quick shoot while over there offering photography training, to do something a little different. the model is from an agency and her styling is her own. This place was DARK , the background exposure is iso 200, f2 at 1/10th of a second. So set up for that to render the bar lights as is and the rest dark. I couldn’t move the customer sat at the table so had to keep those dark. The key light is a studio strobe in a large softbox, feathered to give a gentle loop pattern with the dark wall camera right acting as subtraction to give me modelling and contrast. The glass was added with coke in to give the impression of a drink within the bar and to add a little storytelling and context. The exposure was set at F3.2 which was the lowest I could get from the light and it’s position, this meant that the background went dark and the lamps didn’t over power the scene. You can see other lighting diagrams with explanation on my blog. How to Light Location Photography - how to pose and light this image
How did I create this?
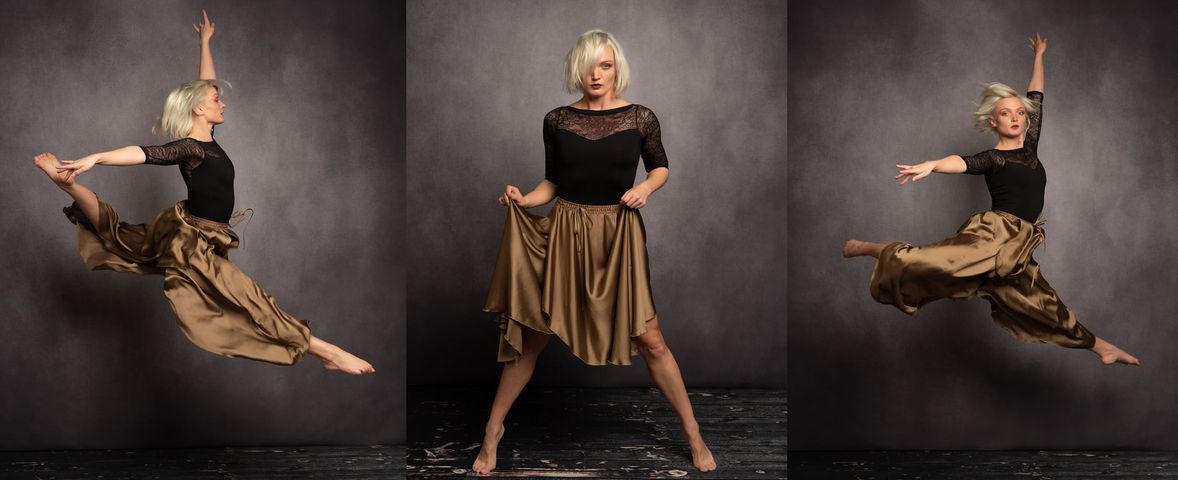
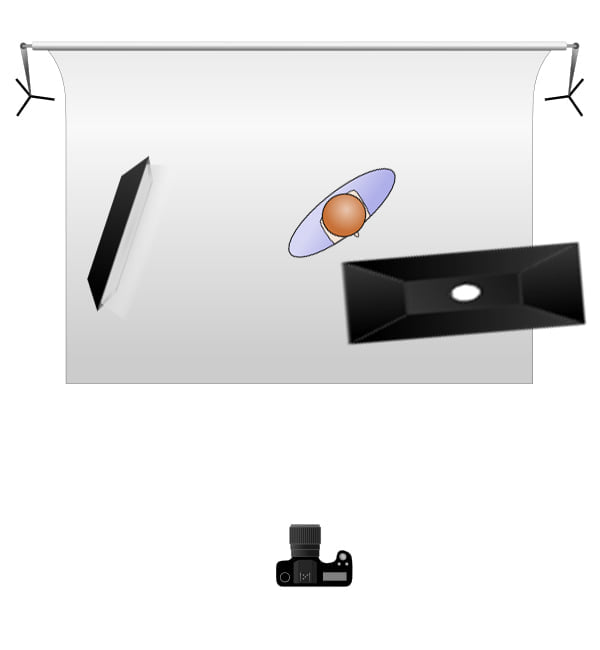
How to light this portrait - The Dancer
How to Light Dance Photography - how to pose and light this image
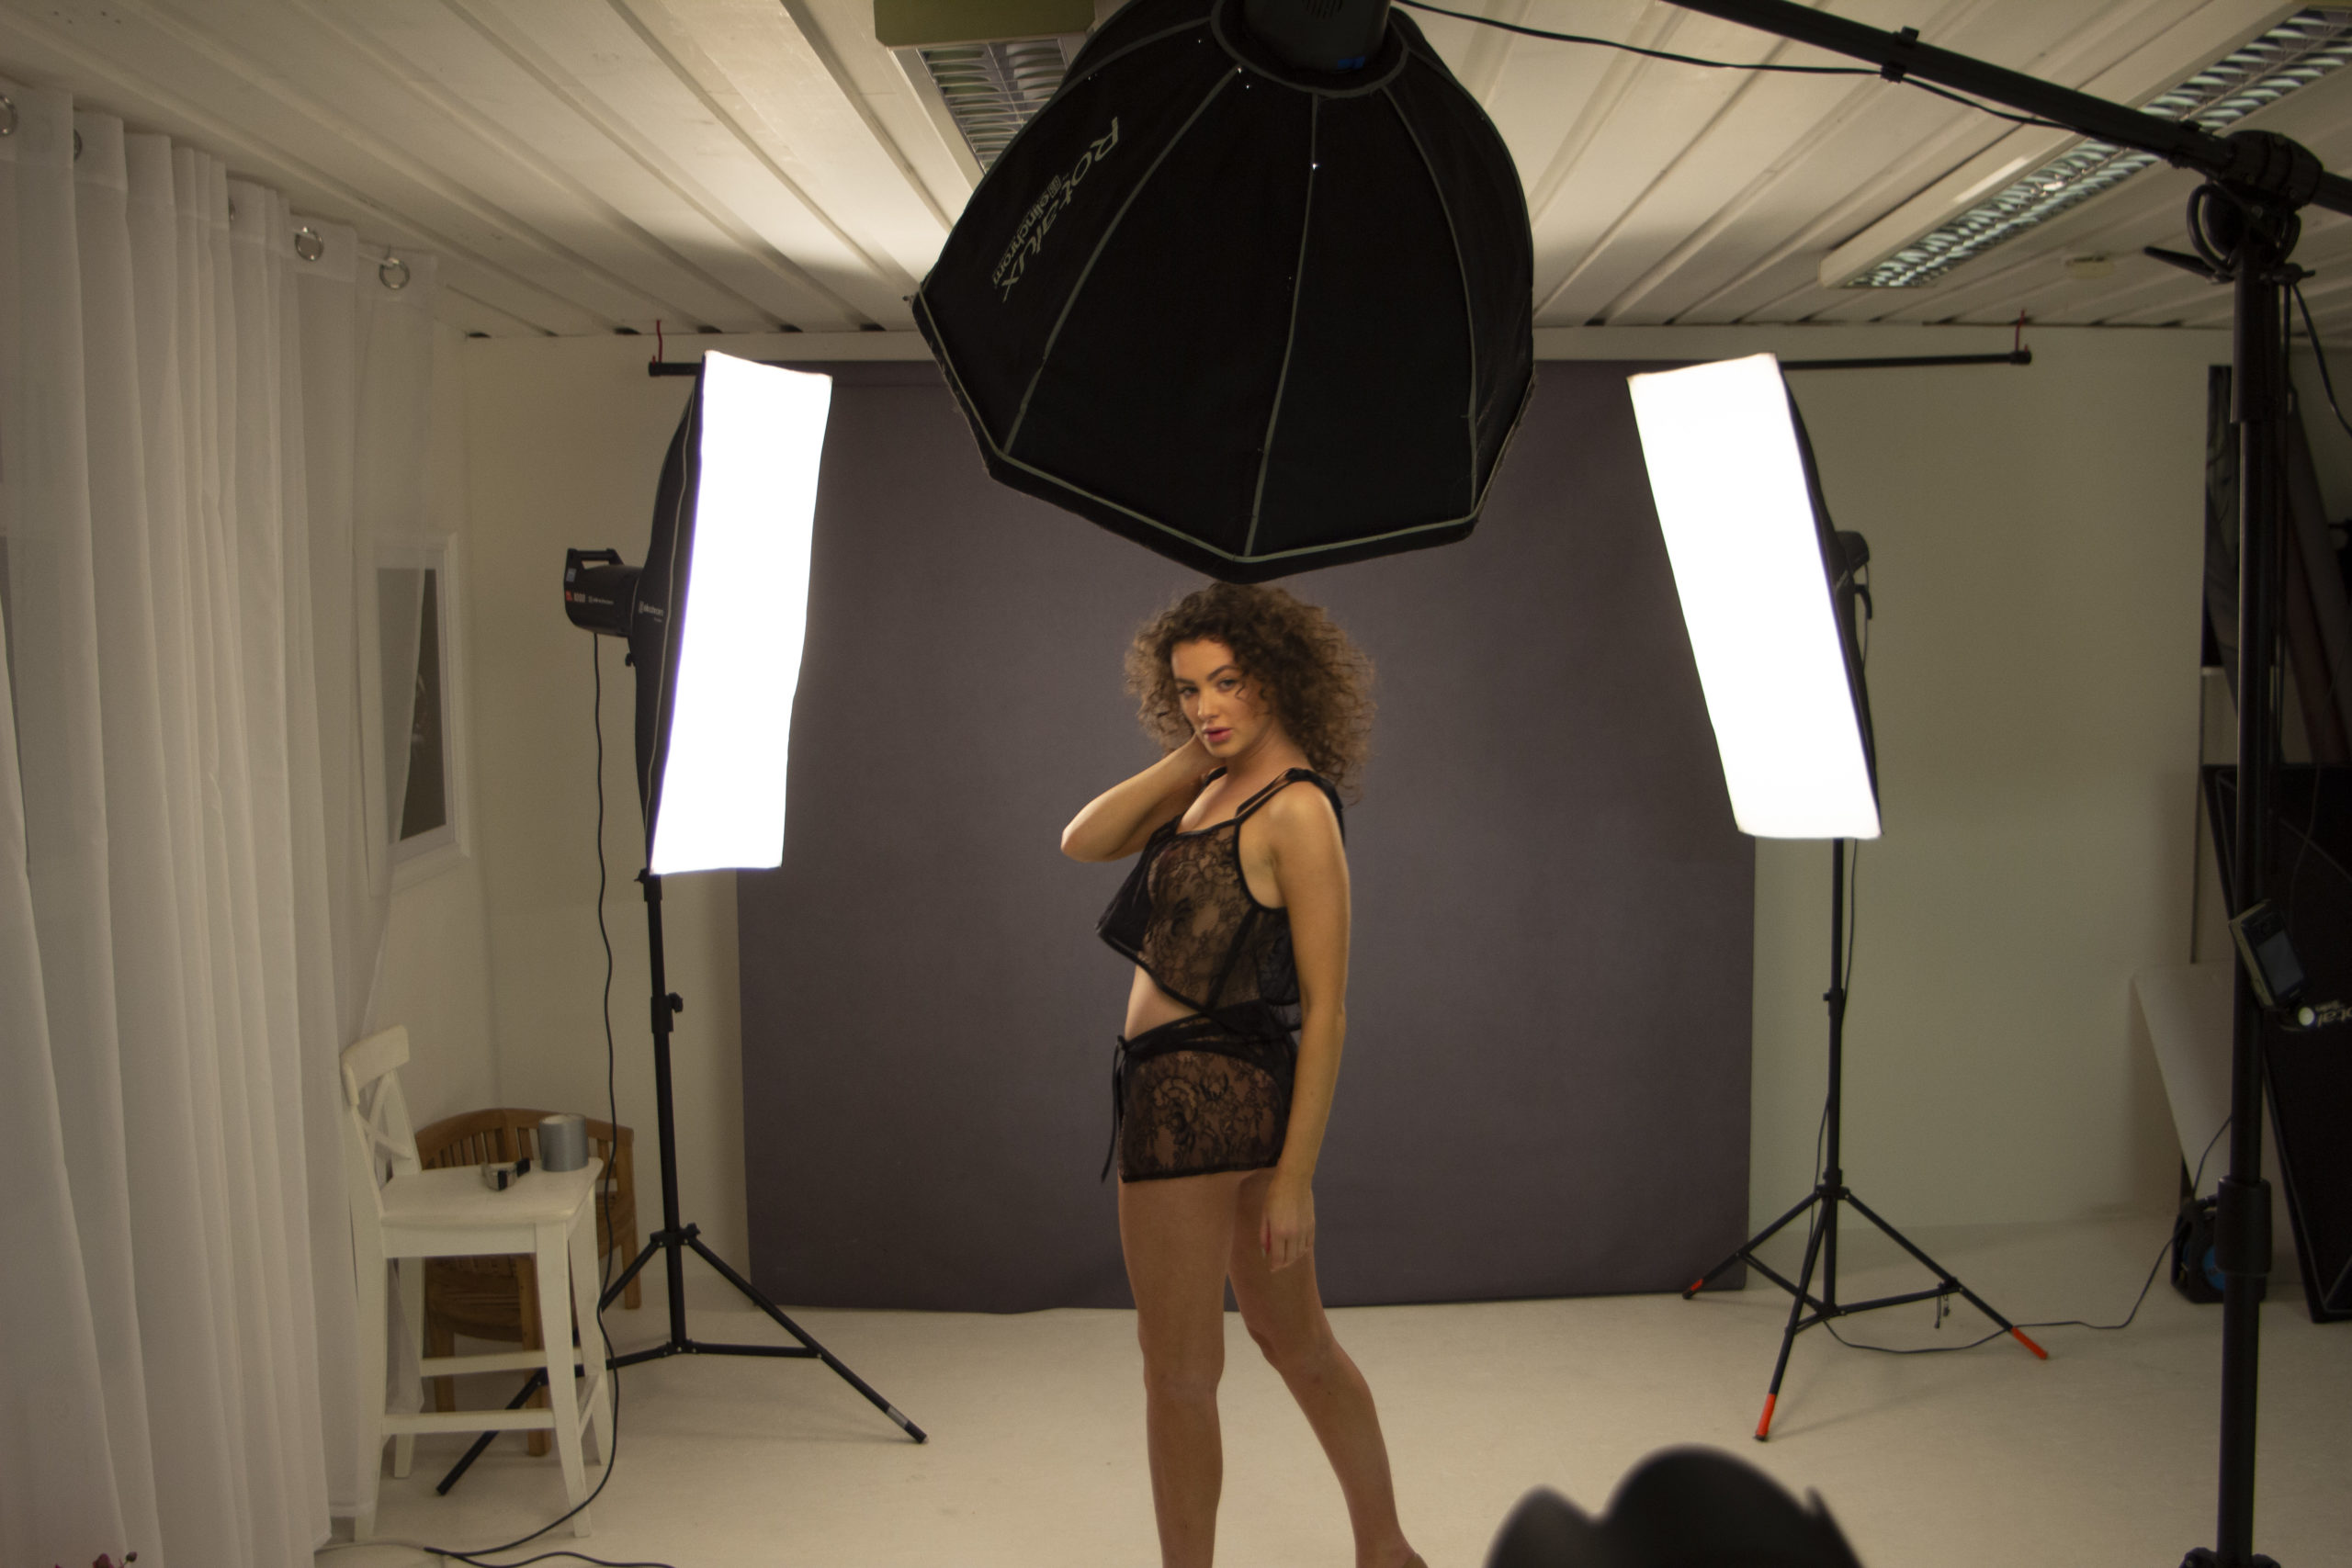
The aim of this portrait was some simple dance shots to show off the new backdrops down at Click Props. This is the awesome Silver tones, I actually designed this one. i’ve added in a vinyl floor just to give it a floor.
Katie is a modern dancer, and this is a guide on how to light dance photography. Katie is used to the stage but unfortunately she doesn’t have any work at the moment. However she is also a great model and has been fabulous on our content days at the Click studios in Watford,
How did I create this?
It’s actually much more simple than you would think. I used a 150cm octobox boomed overhead slightly camera right and feathered across onto Katie. I also added a strip box accent light camera right behind in a usual feather position to separate the back leg.
Lots of timing to get the jump mid air, I think these two took jumps took 6 frames altogether. Fast flash freezes the movement even at 1/125th. F8, Iso 100.
The triptych was a different way of presenting a series of shot.
You can find more lighting diagrams elsewhere in my blog.
How to use a light meter - video tutorial
In a previous blog post, I explained WHY I use a light meter, and why you should, too. Now I’ll show you exactly how to use a light meter in this video tutorial. If you want to really improve your portrait photography and learn in person, take a look at my upcoming Studio Portraiture WorkshopHow to use a Light Meter
Five Important Rules for Studio Lighting
Learning to use studio lighting can be a minefield at first, it takes practice to get it right but it helps if you stick to the basics. Would you believe I still use only one light approximately 90% of the time, for the first two years of my photography career, It was all I used for clients, one light and a big octobox. I practiced, I refined and eventually mastered that one light to get it to do what I want, but now ten years on, these are my tips for anyone starting out with studio lighting or who is looking for studio lighting training. If you are interested in learning in-person, check out my upcoming studio lighting workshop. Five Important Rules for Studio Photography Lighting

1. Light comes down
I regularly provide studio lighting training for photographers at all different stages. The first rule is that all photography light patterns rely on the shadow from the nose coming down, so get that light higher than the head, golden rule for me, softbox up to 1m in diameter, bottom level with top of the head if possible. Over 1m, bottom level with top of the shoulders. We get used to seeing those nose shadows going down with the sun in the sky and ceiling lights so, while we might not always understand why low lights look wrong in an image at first glance, we will see it as wrong. Light coming from below the face is often referred to as “horror lighting” – imagine telling a horror story with a torch pointed at your face from below the chin, and you will understand!
2. Light should be soft
Unless you are deliberately going for an edgy, high-fashion look, clients will always look best in soft light. So master a big soft modifier and if you haven’t got one, consider a scrim in front of your small modifier to make it bigger. Hard light can work well in the right situation but if in doubt, soft light it out.
3. Get your exposure right
When I’m running studio lighting training, it’s important to get a good exposure – get it right in camera. Yes, you can alter it in post production but, changing exposures always degrades the file so if you can get it right in camera, do. My own preference is to use a light meter, so you know everything looks good and is correctly exposed before you press your shutter. You can find out more about why and how to use a light meter in this blog
4. Learn to use a grey card
It’s such a tiny tool in a shoot but it really helps you with consistency. If you are doing multiple set ups and different backdrops, especially with babies, it will just help you get those skin tones the same. The two minutes it takes to get a grey card shot in every set up will save you hours of editing and adjusting when your client wants to purchase a multiple aperture frame.
5. Buy good modifiers
A light that is inexpensive can give you great results if you put a good modifier in front of it. Good diffusion will make that light lovely and soft and help with hot spots. So, if funds are tight, spend it on a good modifier. Be aware also of mixing brands, in particular at the cheaper end of the market. I’m lucky to be an Elinchrom and Flash Centre Ambassador so exclusively use those as they are great kit, but I have been to studios where they have had different brands in their modifiers and have caused issue with colour balance in images when using two or more lights. Buy right and buy once.
Why Choose a Photography Workshop
I have been training professional photographers for many years – I am really enthusiastic about raising the quality of portrait photography for everyone. When you are looking to book photography training – whether it’s your first or you’re a seasoned trainee – you’ll find an array of different options available – online workshops, in person small group photography workshops, larger group workshops and 1:1 mentoring. Hopefully I can help you to choose what’s right for you. There is some information here, and on the training page of my website, but do get in touch with me if you’d like to discuss it in person.Why Choose a Photography Workshop Over 1:1 Mentoring
1. A photography workshop is affordable.
In a group photography workshop, the cost is lower as it is shared amongst the participants. It’s a great option if you are a beginner looking to learn lighting basics, studio lighting or posing. If you’ve been a photographer for a while and you are looking to improve a specific skill, such as portrait posing, working with a certain age group such as children’s photography or if you want to specialise in a gentle such as learning fine art photography.
Usually, you can book a photography training workshop with a deposit, and the balance to pay at a later date, usually a few weeks before the workshop date.
2. Meet other photographers at a similar stage to you for peer support and friendship
A photography workshop is a fantastic way to make friends! You’ll meet a small group of like-minded people, with a passion for photography who want to learn more! If you are at a studio photography workshop, you will take it in turns to be hands-on and to try out your new skills.
Many of my workshops lead to long-term friendships, and often groups will book to return for a workshop on another aspect of photography with the same group of people! It’s a great way to develop a support group group and to make new friends!
3. Others will ask questions that you hadn’t thought of yet!
In a photography workshop group, you will have photographers with different backgrounds and different skill-sets coming together. There may be questions that you haven’t thought of yet that others will ask, and you can share your experience with each other, as well as learning loads from the workshop.
4. You can arrange to practice with other people after the workshop is over.
You will learn so much in my workshop. Not just how to light and pose, but why what I’m teaching you works well. Understanding the reasons behind good posing and correct posing makes it easier for you to reproduce it again yourself later.
Being in a group workshop means that you can arrange to meet up with others to help each other practice! Two heads are better than one, and you’ll all excel at different things, so comparing notes and practising together is a great way to consolidate your knowledge.
5. If you’re uncertain of speaking out there’s safety in numbers!!
Some people can find a 1:1 session intimidating. I’m really not scary, and will always take any training at your pace, but if you are particularly shy then you may find a little more anonymity in a group photography workshop rather than with 1:1 mentoring.
In a group workshop, you can be as quiet as you would like, or speak up as much as you are comfortable with. You will ultimately learn more if you join in, but you can choose whatever you are happiest with.